Translate

Wednesday, June 27, 2012

Summer French Desk

Hello friends:

Are you still enjoying summer?, its great.

Here is the latest on my French desk, I keep adding, redoing, and its looking better everyday.


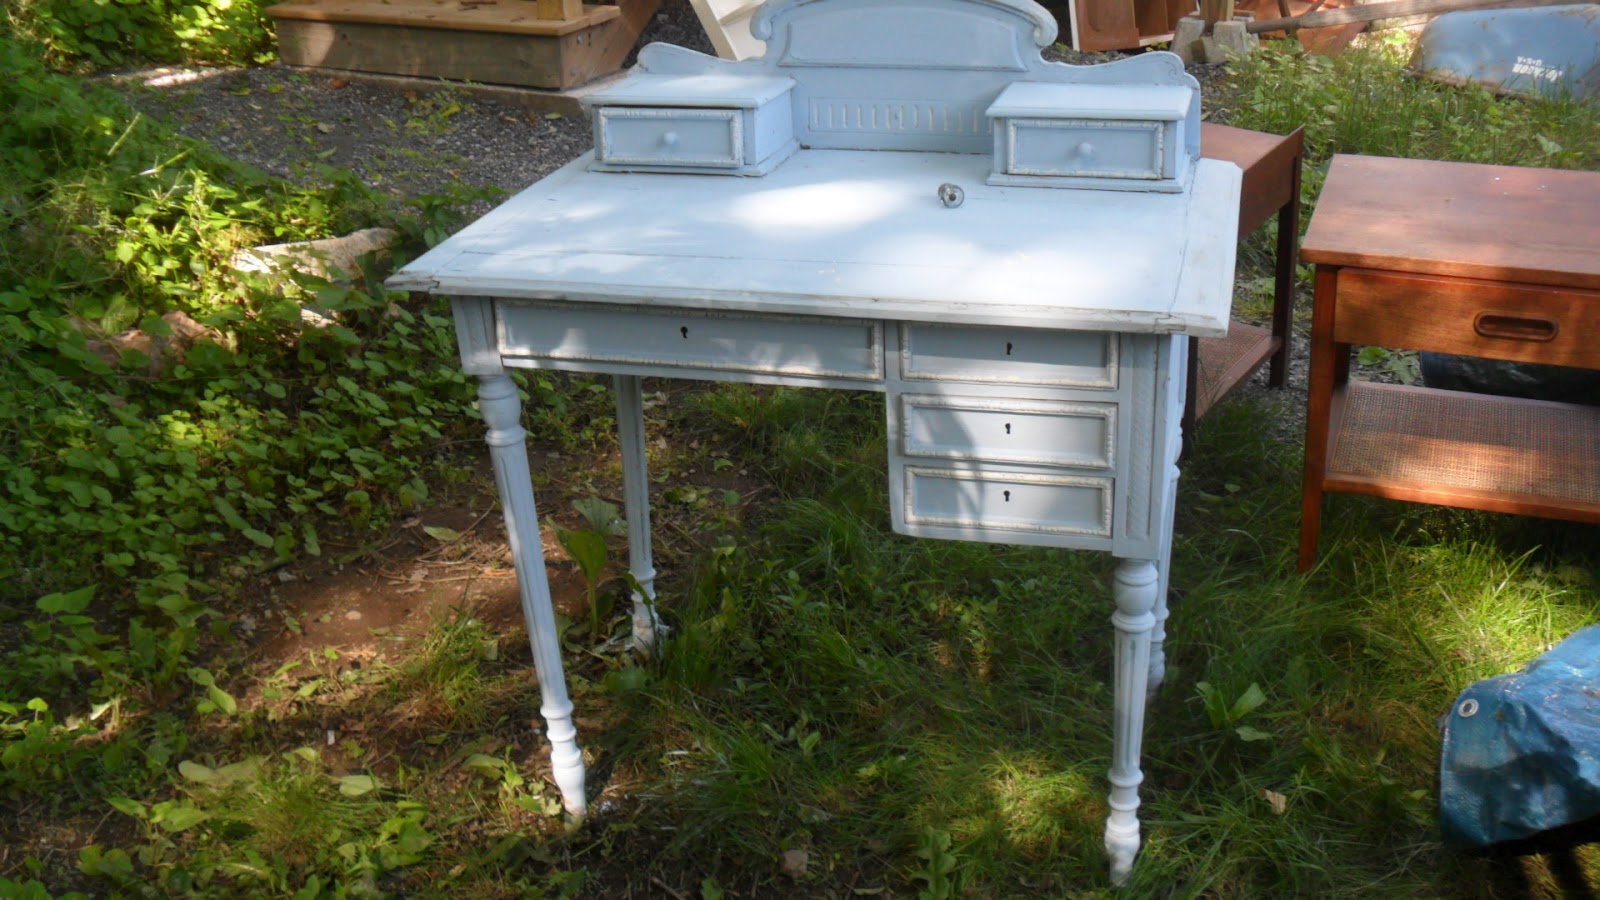
What do you think?  pretty good for a Chalk painter without experiences or classes.  It is possible,

Step One:  Choose a color. I chose Loui Blue, Old White, and both waxes.

Step Two:  Just give it a coat. of Loui Blue

Step Three:  Maybe it needs another coat ( my desk just needed one coat)

Step Four:  With a very very fine paint brush paint the details in Old White or any white
You like, I have loads of Old White so I need to use it.  This step takes a long time, if you
make a mistake just clean it with a rag and paint it over.

Step Five:  Apply the clear wax all over the piece, so to preserve it, I don't have the expensive brushes so I just do it with good rags.  JUST DO SMALL PIECES AT A TIME.

Step Six: Distress with the dark wax.  ONLY APPLY a DAB and rub. Don't apply too much or
it will look very dark.  If you make a mistake just apply the clear wax and it comes off. Or just paint the spot over.
I didn't apply much dark wax, just a little was enough for me, because I like to see the light blue and the white. To be honest I almost didn't do the dark wax because I love the blue is very pale, but I decided to experiment a bit.
Another TRICK:  With an old brush dab half of the brush with dark wax and half with paint and play with this. If you don't like it, just erase it with a rag.  I did this on the corners and top on the design. I use old brushes, cheap ones and save money.

I'm thinking of doing a video for you, remember, I learn by doing, experimenting, , I believe in classes but unfortunately my time is so limited I have to do it myself.  This desk is in my living room, people want it but I love it myself, and after spending two weeks painting it I cann't give it away.

Basically the best way to learn how to paint furniture is by doing. You can also learn from Miss Mustard Seed, or Shauna, but the best way is to do it yourself and learn from your mistakes .

Hope you enjoy it.

Now to the next piece, I found this gorgeous bureau and I'm not painting it, I love oak, the color,
the patina, the coasters, the hardware I just love it. So I'm leaving it alone. SORRY


Isn't this gorgeous, I have to leave it as it is, cannot destroy beautiful oak. The owners took care of the bureau and I will too.

Check my video on how I painted my desk through trial and error with Chalk paint.

Love

Martha


Monday, June 25, 2012

BIG ANNOUNCEMENt

CONGRATULATIONS TO:

   SALLY, she is the winner of the giveaway.

Have fun Sally, there are 255 candies, (oh la la)


the fun begins now, again, thank you all for visiting, and be watching soon I'll have another
fun giveaway.

Friday, June 22, 2012

A SUMMER LOOK

Hello Friends:

A simple way to change for a new season is with pillows.

I made these simple pillows with antique grain sacks.

Simple three mother of pearl buttons.

This sack had lines and letters

This is one of my fav. I made a French ribbon with muslin and stamps, ketp it simple and the weave is beautiful.

I hope you have a great weekend, happy junking.


XOXO

Martha

Thursday, June 21, 2012

A blank wall (continue)

Dear Friends:

Welcome to my blog. I'm trying to find a solution to a couple of empty walls, and I found the answer last night. Here it is:

Antique vintage ceiling tiles from a factory made into a picture.


at night with my mason jar solar jar light.


My antique ceiling tile 8 x 5 picture.  It looks very good on the wall, and I like it better than a bunch of plates, or pictures, its something that I made, its antique, and a conversation piece.  How do you like it? tomorrow I will hang it up. Its big and heavy.

 I got this tile at a Salvage Place years ago, it sat in the basement for a long time.
A rainy day, I brought it up, got myself some plywood at Lowe's and glued the tile 8 ft. by 5 ft. on it. It took forever, you have to put bricks on top  and wait many days for the glue to adhere. This is a large old block of tile, it was the smallest I could find, for the price.  Only the gorilla glue works on this tiles, they are very hard to glue, and this was a big piece.
I painted it with one of my favorite Michael's Robin's blue spray paint, (40% coupon),  I did  prime with a special primer for metal, then, I antiqued a little bit with the antiquing paint, just a bit, and sealed it.  You can see its not perfect, but I love it and my bedroom walls are a very very pale antique blue. So I think it will go perfect.  I just have to glue a couple of (teeth hooks thingy) and oh la la,
done.

Have a wonderful Thursday,

Martha


Wednesday, June 20, 2012

Decorate a blank wall with simple art and New finds.

Hello friends:

WOW, its hot today here, but we need to keep moving, all of us  "designers" and creative people,
4514304070_5715788a5e_b
have to keep busy, we are not used to the hot and humid weather, but I welcome it.
I have two blank walls, and for years I look at them, but don't know what to do. I tried the traditional one picture, didn't like it, then I tried another traditional transfer ware plates, all the same
color , I tried three, then four, I'm looking at them but I still think the wall looks empty.
So, I'm looking for some inspiration and found these idea, I kind of like it but I not sure??
550_101857095
and this wall, and another one:

550_101632715
I like botanical, but don't have any, what do you think???550_101676543


This last one I like, minus the furniture, one of the walls is in the kitchen and the other one is in the bedroom. There is no room for furniture, its small with a low ceiling, you know, the old old, cottage style wooden ceiling, nice and cozy but difficult to decorate because if you put too much, it looks
clutter, I have three windows, two together and the other one to the end of one wall. Difficult walls.  But I think the white plain pictures would look good.

Please I need your ideas, do you have a blank empty wall that needs something??

Now to the fun fun finds:

I found a lot of "junk/treasures"


This hooked rug by Marie Claire, large 6x4

My favorite this handmade rustic rustic, shabby and not a single nail on it. This bench is adorable.

Look at this beauty I'm telling you most people think I'm crazy, I'm crazy for antiques, handmade, rustic, great for the yard, deck, porch.
Solid oak dresser, cannot paint this, love the color of oak, I'm sometimes afraid to paint nice pieces.

The bench look at the details.

I also got two mirrors, but I didn't do the pictures yet, more tomorrow,

XOXO

Martha


Tuesday, June 19, 2012

A summer night feast and a bit of inspiration.

Hello friends:

apartment in the city
It is summer around here, tomorrow we are hitting 90s and very humid, so its time to decorate for summer, we are a bit lazy but
These floors caught my attention, and the red walls, I always wonder how to do the red walls.
Fun kitchen chairs.

Tuna Nicoise Sandwiches
Courtesy of Tartele

Pan Bagnat sandwich and Portuguese Gazpacho

A nice summer snackThe Pan-bagnat The sandwiches are pretty straightforward, combining all the ingredients of a Salade Nicoise; tuna, oilves, green beans, eggs, tomatoes into a sandwich that needs to be made the night before, such as the Pan Bagnat, so that the bread can get all soft inside and the flavors meld together inside.(Occitan: pan banhat for wet bread)


Portuguese White Gazpacho Recipe

Ingredients

| metric conversion
For the white gazpacho
  • 1 1/2 cups 3/4-inch cubes of day-old rustic white bread, crust removed
  • 2/3 cup (3 ounces) unsalted blanched whole almonds
  • 1 small fennel bulb (about 6 ounces), stalks and core removed, bulb chopped; reserve a few of the frilly fronds for garnish
  • 1/2 cup chopped sweet onion
  • 1/2 seedless English cucumber, peeled and chopped
  • Leaves from 4 fresh oregano sprigs
  • 1/4 cup plus 2 tablespoons extra-virgin olive oil
  • 3 tablespoons white wine vinegar
  • Kosher salt and freshly ground black pepper


Get more deliciousness at Portuguese White Gazpacho Recipe | Leite's Culinaria

Scramble eggs "delicioso"

Scrambled Egg Tartines
Great scramble egss recipe  from" I cann't rememeber"


 Scrambled Eggs With Parsley & Garlic Mushrooms
Serves 2

You'll need:
For the mushrooms:
2 teaspoons olive oil
1 cup mushrooms of your choice (we like shitake or chanterelles, but any earthy mushroom will do), chopped
1 garlic clove, minced
2 tablespoons fresh parsley, finely chopped
Salt and pepper to taste

For the eggs:
4 large eggs
2 tablespoons crème fraiche or sour cream
1 teaspoon olive oil or butter
Salt and pepper to taste

Remaining ingredient:
Fresh or toasted bread


In a large sauté pan, heat the olive oil over medium heat and cook the mushrooms, with the garlic, until the mushrooms are just beginning to soften. Remove from heat, add the parsley and toss with a wooden spoon. Make sure not to burn the garlic or it will become really bitter.

Crack the eggs over a medium bowl and scramble them a few times with a fork. Mix in the crème fraiche (or sour cream). Season with salt and pepper. In a smaller sauté pan, heat the olive oil (or butter) over medium heat, add the scrambled eggs and gently stir them with a wooden spoon as they cook. You can decide to cook them until dry but we like them a bit soft and runny.

Serve the scrambled eggs over fresh or toasted bread and spoon a generous amount of sautéed mushrooms over each toast.YUM<YUM<YUM


XOXO

Martha


BIG NEWS:

Katecreativesalvage  giveaway at the "Pink Postcard Blog" .   Go to this link and see details. Denise has a beautiful blog and is a talented furniture painter, and crafter. Thanks Denise for hosting my giveaway.
http://pinkpostcard.blogspot.com


Love,

Martha

Wednesday, June 13, 2012

Make and Display

Hello friends:

Just wanted to share with you a couple of projects just finished them while working on my desk.

Just finished this vintage inspired mason jar lamp.  It has an old fashioned bulb, I covered the cord (Ikea) with a boat rope for an a rustic industrial look.  It found its place on top of my bookcase. The Mason Jar is very very old, about a gallon I think. 


It sits well next to my Big Ben clock and dear antique books don't you think. The old fashion bulb adds to the vignette.

I hope you like it,

Martha


Sunday, June 10, 2012

My little French Desk Adventure

Hello friends:

I wanted to show you Part 2 of my Desk Adventure.

I decided to give a coat of the  ASCP , I had

a little bit of Loui Blue, but I have loads of other
colors that are sitting there for months.  So, I dragged the brushes out and started.  Here you will see some pictures, bear in mind is not finished yet, I'm slow at painting because I don't want to ruin
such a nice piece.


This is how it was when I got it.

The first coat of the blue.

Got risky and did the borders with white I don't know do you like it????

More white???

This is the surprise glass old old knobs that were hidden inside the middle drawer.
The small drawers have a cute little wooden knob, the rest of them have keyholes only.


Add captionYou can see my "white border" it took me forever, and ever, it was late and the mosquitoes and flying ants and bugs were killing me. So I covered it with my a blanket and inside I went.

I did finished the white and did a little waxing just to see what it would like. Unfortunately we had so much rain here that the mosquitoes, bugs are going crazy, so I had to go in bye bye bugs,

This part is when I got the "famous" wax, you heard me I said "famous" this hype about the paint and the wax is insane, the paint is okay, but its too thick, and a bit pricey. You can get the same exact colors for half the price. The wax is tricky, its easier to distress with other products.

 I put a little tiny bit of wax and rubbed it into the flowers and didn't like it so I wiped it off. The wax is confusing to me. There are tons of tutorials out there and every one is different. So I just did what I always do, a little test, and I didn't like it so I painted it over.  I will try another way tomorow and see how it goes.

Call me crazy, but I went to the paint store in my town, and I talked to the woman who mixes paints, I showed her the pictures and a sample of the paint. She didn't know much about the paint or waxes, but she liked my pictures, so that was good.  We talked a lot about colors and paints, she is very good about mixing and matching colors, and I always go with a picture, she loves to experiment with colors. I told her I have two years of paint, I need to start painting or is going to go bad.  Oh, one more thing, she mixed a little formula and came up with the Loui color. I think she got intrigued, she apologized and said "by the way if you run out, I have it here for you". Of course I told her this is chalkpaint, and she said "I can make it chalkpaint, I have a formula". Of course I have enought blue to paint an entire house, she doesn't know this, I just wanted an opinion, I guess I got it.


Well, let me know how you like my adventure, to be continue...

blessings

Martha

Friday, June 8, 2012

Make and Display Rustic, Industrial Lamps

Hello Friends:

Happy Friday, I love Steam punk lamps from Anthropology, Pottery Barn, but not their prices.
I decided to make my own, I love the old Telegraph Insulators Rustic, steampunk, table lamps. People sometimes throw them away, or not even know what they are. I find them interesting and so vintage, industrial.  I love them next to lace, lavender bunches, books, and you have a vignette, but now, you can have an industrial lamp made by me. Its gorgeous, I love it, sorry but I can't believe I'm making these lamps out of discard pieces, I have some more designs on the works, a surprise.

 So here is my latest design. I did the base, and drill the hole for it, then sanded it and stained it.  I had a good friend an electrician do the wiring since I'm not that good at it.  I had the Insulator, this is my favorite color, its beautiful at night, so romantic.

I placed the light on top of a French turquoise poem antique book, one of my favorite little books.
I don't know if you can see it but it looks so pretty on the typewriter antique table.


I took this picture so you can see the color, its hard, sorry to take pictures of lights.

I wish you could see the light in person, its a soft teal, I just lay some lavender of course, behind it, so vintage with the lace, old books, ready to listen to music or you can use them as night lights also.

This picture has  another insulator in the back.


The turquoise light is beautiful, I waited until it got dark to take the pictures, because it looks
so stunning at night.  It has a 5ft. cord with an on/off switch and a candelabra bulb,

What do you think??

On to the new finds, I found this gorgeous French desk, totally blue and distress.

It has lots of little drawers, and there was a surprise inside one of the drawers,
I found several tiny old crystal knobs.  Each drawer has a keyhole but I didn't find
any keys.

I love the new find, it has plenty of distressing, but I got my hands on it already,
I'll show you the pictures tomorrow.


Great find,

Wish you great junking Saturday,

love

Martha